How to Make Your Playlist Public on Spotify Quickly & Easily
Ready to share that perfect mix with the world? Making a playlist public on Spotify is straightforward. Just head to the playlist, tap the three-dot menu, and hit Make public. It’s a simple click that turns your personal soundtrack into something anyone can find and enjoy.
Why Bother Making a Spotify Playlist Public?
Flipping the switch on a playlist’s visibility does more than just change a setting—it transforms your private music collection into a public, shareable experience. You’re essentially opening up your unique taste to a global community.
This is a must if you're trying to build a following, share a specific vibe for an event (like a wedding or a road trip), or just connect with people who love the same tunes.
Spotify has offered public and private playlist options for years, which has been a huge driver for social sharing and music discovery on the platform. With billions of playlists out there, knowing how to get yours seen is key. Making it public means it can pop up in search results for anyone to find. According to data from The Social Shepherd, user-generated playlists are a massive part of the listening experience.
Understanding Your Visibility Options
Before you go public, it’s good to know exactly what each setting does. They're pretty simple, but the differences are important.
- Public: This is the "open door" policy. Anyone on Spotify can search for, follow, and listen to your playlist. It will also show up on your public profile for all your followers to see.
- Private: Think of this as your personal music diary. Only you can see and play the playlist. It’s completely hidden from your profile and won't appear in search, even if someone gets their hands on a direct link.
- Collaborative: This is the "group project" setting. You can invite friends to add, remove, and reorder songs. A collaborative playlist can be either public or private, which is a nice touch for flexibility.
Playlist Visibility Settings at a Glance
To make it even clearer, here’s a quick breakdown of what each setting means for you and other listeners.
| Setting | Who Can See It? | Appears on Profile? | Searchable on Spotify? |
|---|---|---|---|
| Public | Anyone with a Spotify account | Yes, by default | Yes |
| Private | Only you (and invited collaborators) | No | No |
| Collaborative | Depends on base setting (Public or Private) | Only if it's also Public | Only if it's also Public |
This table should help you decide which option is the right fit for your playlist, whether you're creating a secret mix for yourself or a party playlist for the masses.
The process itself is incredibly simple, no matter what device you're using.
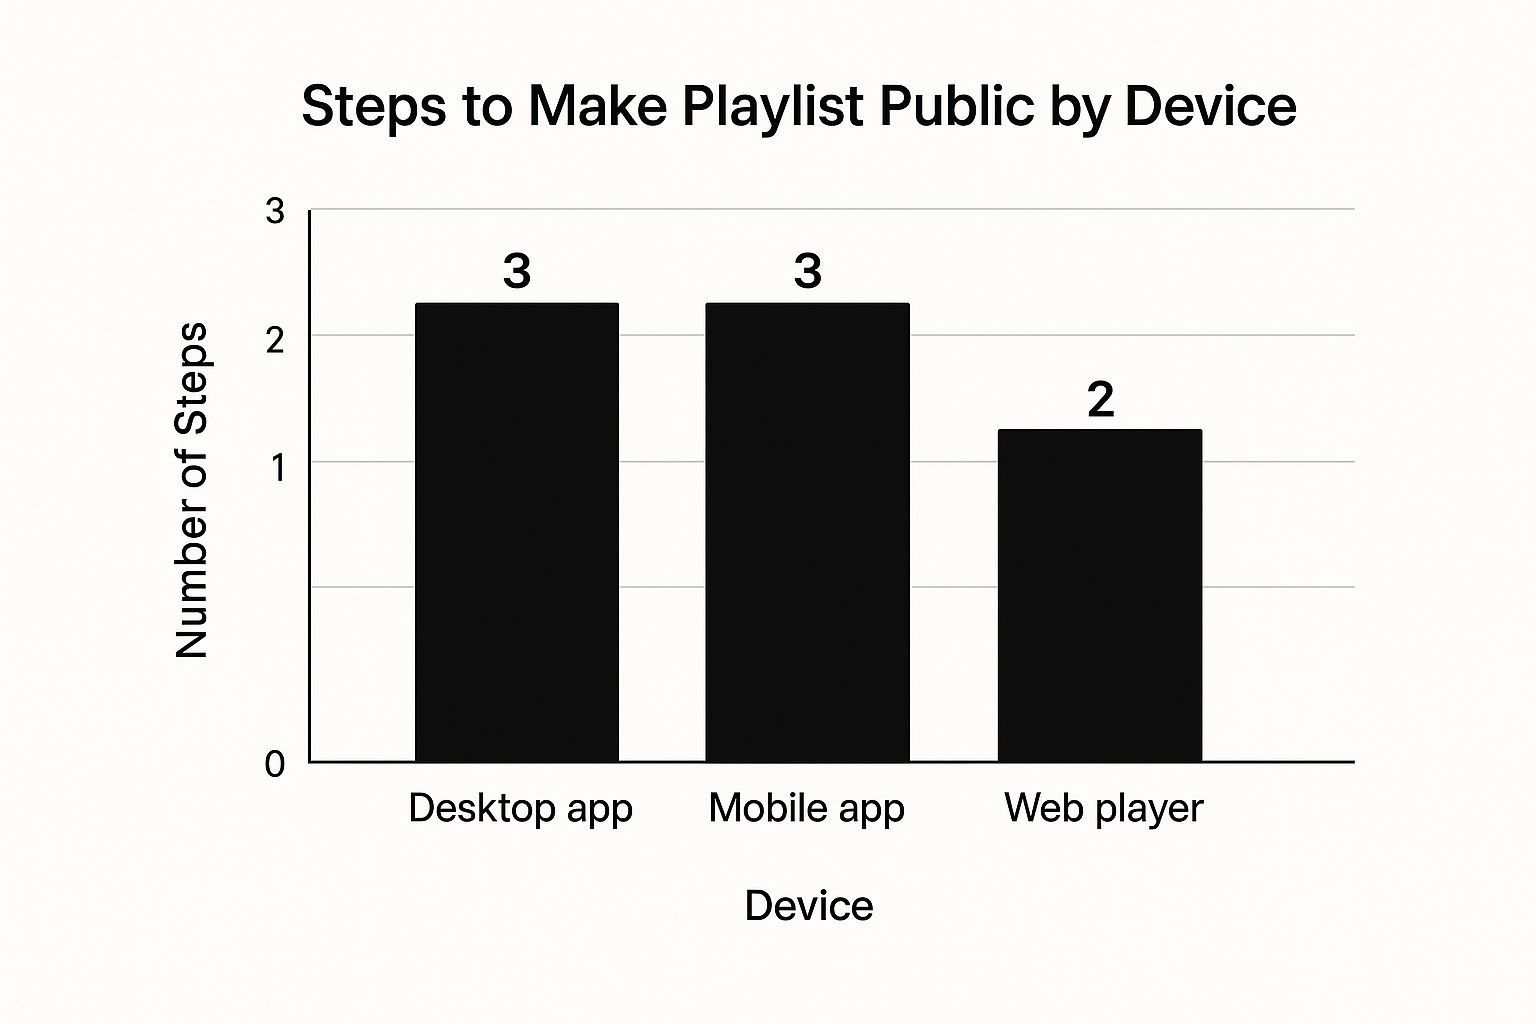
As you can see, it really only takes a couple of taps. The whole thing is designed to be quick so you can get back to discovering and sharing great music.
Making Your Playlist Public on Desktop
If you’re like me and prefer the full-featured Spotify desktop app for crafting the perfect playlist, you’ll be happy to know that sharing your creation is incredibly straightforward. The bigger screen and mouse just make it easier to drag, drop, and organize tracks—especially when you're putting together a killer mix for a party and want your friends to get a sneak peek.

First things first, open the Spotify app on your computer. Find the playlist you want to share in your library on the left sidebar and click on it.
Once you’re looking at your playlist, find the three-dot icon located right under the playlist's name and artwork. Clicking it opens up a menu with a bunch of options. Look for one that says “Make public” and give it a click. Spotify will switch the playlist's status instantly, usually without any big confirmation pop-up. It's a subtle but immediate change.
Confirming Your Playlist Is Visible
Now, here’s a crucial follow-up step that a lot of people miss. Just because a playlist is "public" doesn't automatically mean it shows up on your profile for everyone to see. You often have to add it there manually.
A playlist can be public (meaning anyone with the link can listen) but still hidden from your main profile page. You need to explicitly add it to your profile for visitors to discover it.
Go back to that same three-dot menu on your playlist.
- If you see the option "Add to profile," click it. This makes your playlist visible to anyone who visits your Spotify profile.
- If the menu shows "Remove from profile," then you're all set! It’s already public and proudly displayed on your page.
Taking a second to double-check this ensures your carefully curated mix actually gets the audience it deserves.
Going Public From Your Mobile Device
Let's be real—most of us are glued to our phones. That makes the Spotify mobile app the go-to spot for building and tweaking playlists. Maybe you just perfected a high-energy workout mix and need to send it to your gym buddies right now. You don't have to wait to get to a computer.
Making a playlist public is straightforward on both iOS and Android, though the mobile interface can feel a little different than the desktop version.

First, pop open the Spotify app and head over to Your Library. Find the playlist you’re ready to share with the world and tap into it. Look for the familiar three-dot icon, which is usually hanging out under the playlist's title.
Tapping that icon pulls up a menu with all your playlist actions. From here, just find and select “Make public.” Boom, it's done. Your playlist is now technically public, so anyone you send the link to can tune in.
Getting It Seen On Your Profile
Here's a common point of confusion: making a playlist public doesn't automatically stick it on your profile for everyone to see. That’s a separate, intentional step. It's actually a great feature because it lets you decide which playlists are polished enough to represent your impeccable taste.
Think of it this way: "Public" makes the playlist accessible, while "Add to profile" makes it visible. You need both if you want people to discover it on their own.
To finish the job, you just need to:
- Tap that same three-dot menu on your playlist again.
- Find and select the "Add to profile" option.
- And that's it! Your masterpiece will now be featured on your public Spotify profile for followers and curious visitors to discover.
Now that your playlist is truly out there, you can grab the link and share it anywhere. If you want to take it a step further and blast your new creation throughout your home, check out our guide on how to link Spotify to Google Home. It's a great way to make sure your music gets heard.
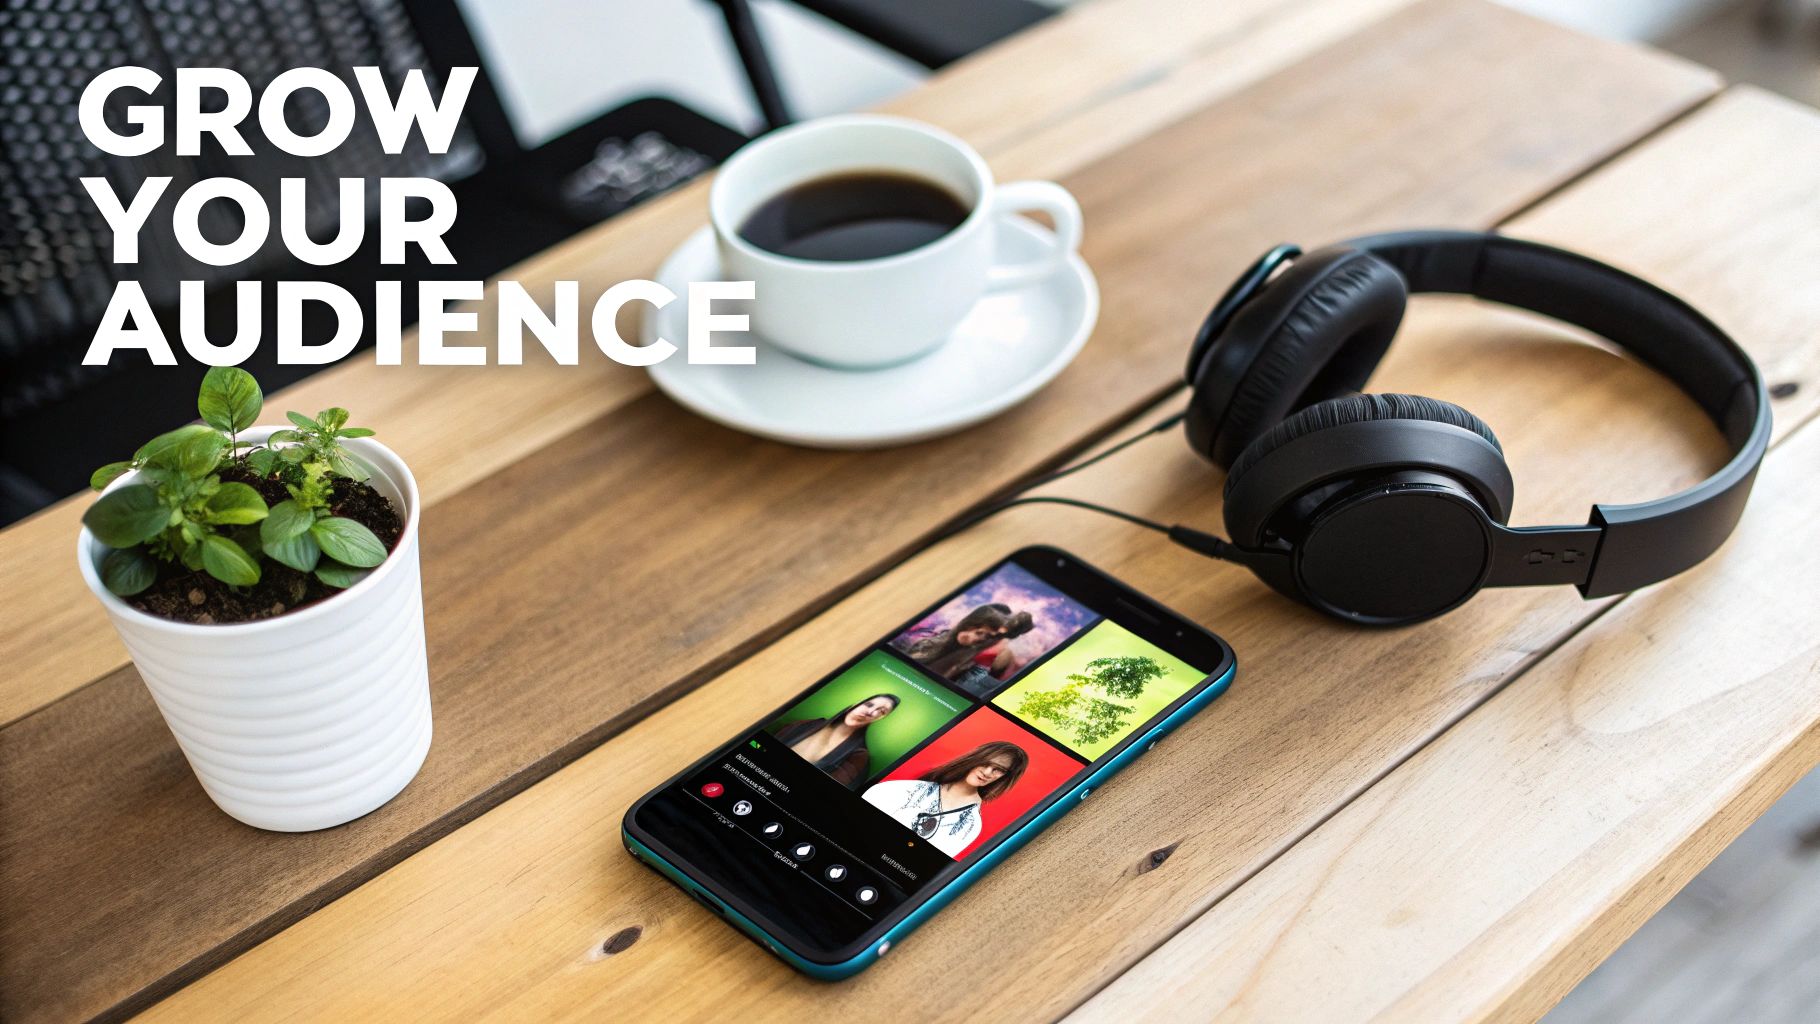
Turning Your Playlist Into a Sensation
Alright, so you’ve flipped the switch and made your playlist public. That’s the first hurdle. But now comes the exciting part: turning that carefully curated list of tracks into something people actually want to listen to, follow, and share.
Think of a public playlist as your own personal radio station. It’s a fantastic way for aspiring music curators, influencers, or just anyone with great taste to build an audience.
What separates a playlist that gets a few pity plays from one that starts trending? It almost always boils down to presentation. First impressions are everything, especially when someone is scrolling through hundreds of options. You need to nail the three core elements a listener sees before they ever hit play.
Crafting an Unforgettable First Impression
Your playlist's entire identity is wrapped up in its title, description, and cover art. If you skimp on these, it's like throwing a party but forgetting to send out invitations with the right theme.
- Create a Catchy Title: Ditch the generic names like "Chill Vibes" or "Workout Mix." Get creative with something that paints a picture, like "Midnight Drive Through Neon Streets" or "Sweat Equity Gym Flow." A memorable title sticks in people's minds and is way easier to search for.
- Write a Compelling Description: This is your secret weapon for discoverability. Pack it with keywords people are likely to search for—think "lo-fi study beats," "80s synthwave," or "indie coffee shop." A sentence or two explaining the vibe is all it takes to hook a potential follower.
- Design Eye-Catching Cover Art: A custom image instantly makes your playlist look more polished and professional. It helps you stand out from the endless grid of default album covers. You don't need to be a graphic designer; a simple, clean graphic that matches the mood of the music works wonders.
Once you’ve got the packaging right, it's time to get your masterpiece out into the world. Smart promotion is what elevates a personal mix into a viral hit.
The most successful playlist curators don't just create; they connect. They actively engage with communities and use multiple platforms to drive traffic back to their Spotify creation.
Now that your playlist is public, you need to get it in front of the right ears. For a slick, modern touch, you can promote your public Spotify playlist with QR codes that people can scan at events, on flyers, or anywhere in the real world.
Of course, knowing all the digital sharing options is key. Our guide on how to share your playlist on Spotify walks you through all the different ways you can spread the word. Don't be shy—post the link on your social media, drop it in relevant Reddit communities, or even add it to your email signature. The more places you plant the seed, the faster your audience will grow.
Fine-Tuning Your Playlist's Privacy and Settings
So, you're thinking of making your playlist public? That’s one of the best parts of Spotify—sharing your musical discoveries. But before you do, it's worth knowing what you're actually sharing. When a playlist goes public, it’s not just the tracks; your Spotify username and profile picture go along for the ride, attached to your creation for all to see.
The great thing is, you’re in the driver's seat. If you ever feel like taking a playlist back offline, you can flip it back to private just as easily. Head back to that same three-dot menu, make the switch, and poof—it’s your little secret again.
What Happens When You Go Private Again?
Switching a playlist from public back to private is instant and has a few key effects. Here’s the breakdown:
- The playlist immediately vanishes from your public profile.
- It will no longer pop up in Spotify search results for other users.
- Anyone who followed it will lose access—it disappears from their library.
This flexibility is key. It means you can share your musical taste freely, without worrying that it's a permanent decision. You get to control your online presence on your own terms, which is exactly how it should be.
Spotify has become a massive social hub for music lovers, boasting over 600 million active users. Sharing is a huge part of what makes the platform tick, especially for premium subscribers who dive into a nearly endless ocean of public playlists. If you're curious about the numbers, you can get a deeper look into Spotify's user statistics over at Soundcamps.com.
Ultimately, getting comfortable with these settings lets you engage with the wider music community exactly how you want to. To take it a step further, check out our guide on how to find friends on Spotify and start building your network.
Got Questions About Your Spotify Playlists? We've Got Answers
So you've figured out how to make your playlist public, but things still feel a bit... weird. Maybe friends can't find it, or it's not showing up where you expect it to. Don't worry, this is super common. Let's walk through some of the most frequent head-scratchers.
"I Made My Playlist Public, but It's Not on My Profile. What Gives?"
This is easily the question I hear most often. Here’s the deal: making a playlist public just means that anyone who has the link can listen to it. It doesn't automatically pin it to your profile for the world to see.
Think of it as a two-step process. First, you unlock the door by setting the playlist to public. Then, you have to actually put it out on the front lawn by choosing "Add to profile" from that same three-dot menu.
"Why Can't My Friends Find My Playlist When They Search for It?"
Ah, the mysteries of the Spotify search algorithm. Just because a playlist is public doesn't mean it will instantly pop up in search results for everyone. Spotify’s search tends to favor playlists that already have some clout—think lots of followers, plays, and a distinct name.
If you just created a brand new playlist called "Workout Mix," it's going to get buried under thousands of others with the exact same name.
Pro Tip: The quickest and most reliable way to get your new creation into your friends' hands is to share the direct link with them. Search visibility will come later, once your playlist starts getting some love.
"Is There a Limit on How Many Public Playlists I Can Have?"
Technically, you can have a ton of public playlists. However, there is a limit to how many you can display on your public profile—right now, that number is around 200.
If you're a true playlist connoisseur with a massive library, adding a new one to your profile might push an older one off the list. The older playlist is still public and accessible via its link, it just won't be one of the first 200 people see when they visit your page.
Ready to manage all your premium accounts, not just Spotify, without the hassle? With AccountShare, you can securely group-buy and share subscriptions at a fraction of the cost. Visit AccountShare to learn more.