How to Check Subscriptions and Master Your Money
Share
Figuring out how to check your subscriptions is actually pretty straightforward.The best place to start is usually the central subscription hub on your iPhone or Android phone. After that, a quick scan of your bank and PayPal statements for any repeating charges will almost always unearth a few forgotten services you're still paying for.
Why Finding Your Subscriptions Matters

It almost always starts with a "free trial." You sign up, thinking you'll cancel it later, but then life gets in the way. Before you know it, several small, recurring payments are quietly slipping out of your bank account every month for services you haven't touched in ages. This is a classic case of subscription creep, and it can put a real dent in your budget over time.
A single $9.99 monthly fee might not feel like a big deal. But when you have a handful of them—that streaming service for one show, a fitness app you used for a month, a software tool for a one-off project—they can easily stack up to hundreds, or even thousands, of dollars a year. The real kicker is that these charges are often spread out across different accounts and payment methods, making them incredibly difficult to track down.
The Hidden Costs of Convenience
Let's face it, subscriptions are designed to be frictionless. That's their biggest selling point, but it's also why they're so easy to forget. The "set it and forget it" model is great for companies, but not so great for your wallet when you're the one forgetting.
This business model is absolutely everywhere now. In fact, the subscription economy has ballooned by an incredible 435% over the past decade. It's on track to become a $3 trillion global market by 2025. You can dig into more details about this explosive growth in subscription business models and what it means for consumers. With more companies shifting to recurring revenue, it's never been more critical to stay on top of what you're paying for.
Key Takeaway: This isn't just about canceling services you don't use anymore. It's about gaining financial clarity. When you do a full subscription audit, you empower yourself to make conscious decisions about where your money is going, turning passive expenses into active choices.
Where These Subscriptions Typically Hide
So, where do you even start looking? To effectively check your subscriptions, you need to know their common hiding spots. From my experience, recurring payments almost always pop up in one of these places:
- App Stores: Both the Apple App Store and Google Play Store have centralized sections where you can see every subscription tied to your Apple ID or Google account.
- Direct Website Billings: Think about services like Netflix or Adobe. Many companies, especially for software and streaming, get you to sign up directly on their website, billing your credit card or debit card.
- Payment Providers: Don't forget to check platforms like PayPal. They have their own "automatic payments" dashboard where subscriptions can lurk, completely separate from your bank statements.
Knowing these common culprits is the first step to regaining control. By methodically working through each of these areas, you can piece together a complete picture of your financial commitments and stop the leaks.
Find Every Subscription on Your Phone
Let's be honest, our smartphones are the primary culprits for those "subscribe and forget" moments. A one-tap free trial or a slick new app makes it almost too easy to sign up for things. Before you know it, you've got a handful of recurring charges you can't even remember authorizing.
The good news? Both iPhone and Android have built-in dashboards designed specifically for this. This is your first and most important stop for any subscription audit because it catches all the charges tied directly to your device's main account.
This quick visual breaks down the typical path you'll follow on either platform to get to your subscription settings.
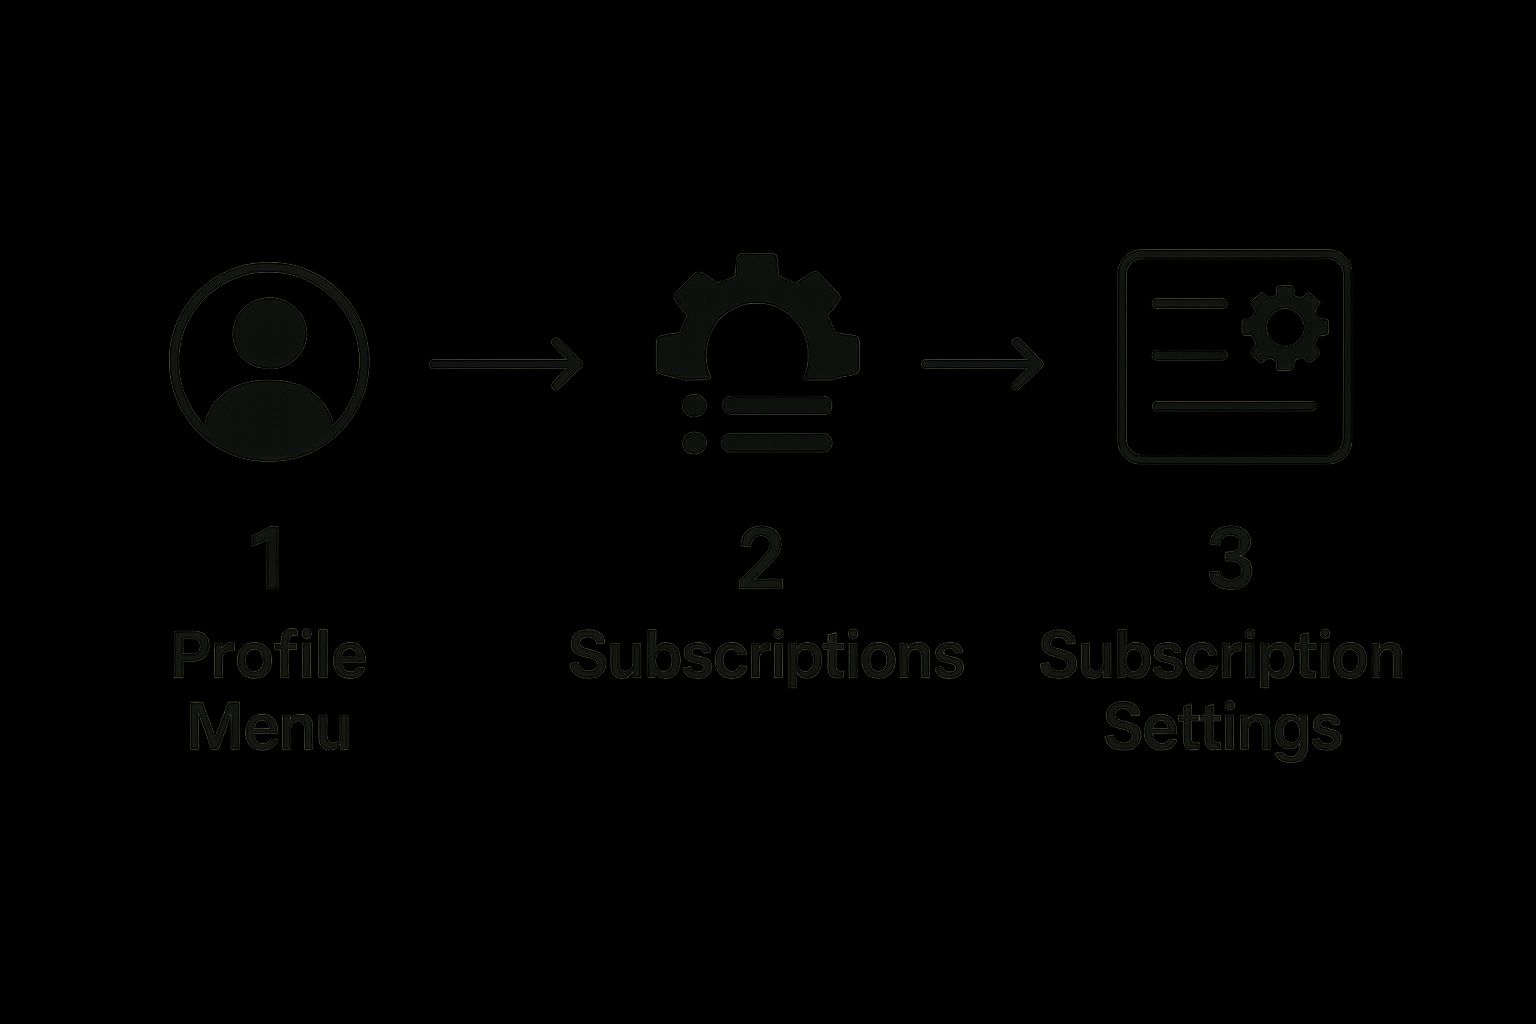
As you can see, regardless of your device, the journey is similar: you start at your profile, dive into a dedicated subscriptions menu, and then manage each service from there.
Check Subscriptions on an iPhone
If you’re on an iPhone, Apple keeps everything neatly organized under your Apple ID. This is where you'll find a complete list of every service that bills you through the App Store.
Here’s the path to take:
- First, open the Settings app.
- Tap your name right at the top to open your Apple ID settings.
- From there, select Subscriptions.
You'll see two lists: Active and Expired. This is your command center. You can see what each service costs, when it's set to renew, and most importantly, you can cancel anything you don't want anymore with a simple tap. It’s a powerful feature that’s surprisingly easy to miss.
Uncover Subscriptions on Android
For the Android crowd, your subscription hub lives inside the Google Play Store. This is mission control for any subscription you started through an app downloaded from Google's ecosystem.
Here’s how to find it:
- Open the Google Play Store app.
- Tap on your profile icon in the top-right corner.
- In the menu that pops up, choose Payments & subscriptions.
- Finally, tap on Subscriptions.
Just like on an iPhone, this screen gives you a clear rundown of everything billed to your Google account. You can check renewal dates, see the costs, and—crucially—cancel unwanted services directly from this menu.
Insider Tip: Remember, not everything will show up here. If you signed up for a service on its website and then just downloaded the app to log in, it's likely billing you directly. I always recommend cross-referencing your app store list with your bank and PayPal statements to get the full picture.
Once you've done a full audit, you might find some services you want to keep but wish were cheaper. This is the perfect time to get creative. Our guide on subscription sharing tips has some great, practical ideas for cutting those monthly costs without giving up the services you love.
Check Your Bank and PayPal for Hidden Fees
While checking your phone’s subscription settings is a solid first step, it won’t give you the full story. Many services, especially those you sign up for on a desktop, intentionally bypass app stores and bill your payment methods directly. To get a complete picture, you need to put on your detective hat and dig into your PayPal account and bank statements.
These direct charges are the sneakiest. They often come from a free trial you started for a productivity tool years ago or a one-time purchase that quietly morphed into a monthly plan. Because they don't show up in your phone's central hub, they can fly under the radar for months or even years.
Uncovering Automatic Payments in PayPal
PayPal is a classic hiding spot for these forgotten “ghost” subscriptions. Its convenience is a double-edged sword; it’s incredibly easy to authorize a recurring payment during checkout and then completely forget you did it.
Luckily, PayPal keeps a running list of every merchant you've greenlit for automatic billing. Here’s how to find it:
- First, log in to your PayPal account on a computer.
- Click the gear icon to go to Account Settings.
- From there, select the Money, Banks and Cards tab.
- Scroll down the page and click the link for Set Automatic Payments.
This page is your command center. You’ll see a list of every active (and inactive) agreement. You can click on any merchant to view the payment history and, most importantly, hit the Cancel button to revoke their access for good.
Become a Bank Statement Detective
Now for the final frontier: your bank and credit card statements. This is the ultimate, catch-all method for finding every single recurring charge tied to your accounts. My personal recommendation is to pull up at least three months of statements. This gives you enough data to spot payments that repeat consistently.
The biggest hurdle here is deciphering the often cryptic billing descriptors. You might see a charge from "DRI*Digital River" or "AMZN MKTP" and have no idea what it is. That first one is a common e-commerce platform, and the second is Amazon Marketplace—both could be subscriptions.
Pro Tip: Don't just gloss over a recurring charge you don't recognize. A quick Google search of the exact merchant name on your statement will almost always reveal the company behind the fee. This simple trick has personally saved me from paying for services I thought I'd canceled long ago.
The subscription economy is absolutely booming. It was valued at around $278 billion in 2024 and is projected to explode to over $6.3 trillion by 2033, according to a recent subscription e-commerce analysis. This massive growth is precisely why learning to track your own subscriptions has become a critical financial skill.
To help you get started on your own detective work, here’s a quick reference guide for some of the most common billing descriptors you might find on your statements.
Common Subscription Billing Descriptors on Statements
This table can help you quickly identify some of the most popular services based on how they typically appear on your credit card or bank statements.
| Service | Common Billing Descriptor | Notes |
|---|---|---|
| Amazon Prime |
AMZ*Prime or Amazon Prime
|
This is for your core membership. Channel add-ons may be listed separately. |
| YouTube Premium |
GOOG*Youtube or GOOGLE*YouTube
|
Often appears under Google's general billing name. |
| Netflix | NETFLIX.COM |
Usually straightforward, but check the amount to confirm your plan level. |
| Spotify |
SPOTIFY USA or Spotify AB
|
The charge is typically very clearly labeled. |
| Adobe Creative Cloud |
ADOBE or Adobe Systems
|
Check your Adobe account to see which specific software you're paying for. |
Remember, this is just a starting point. Always investigate any charge you aren't 100% sure about. A few minutes of investigation can save you a surprising amount of money over time.
Go Straight to the Source: Manually Check Popular Services
Sometimes, the most reliable way to find out what you’re paying for is to go directly to the service provider. After you’ve poked around your phone’s settings and scanned your bank statements, the next logical step is to log into the big players themselves. Many subscriptions, especially for streaming and software, only show up inside your account dashboard on their website or app.
Think of this as the final piece of the puzzle. This direct check gives you the most detailed and accurate information—your exact plan, the renewal date, and your payment history—without any guesswork. It's a proactive step that often catches recurring payments that other methods might overlook.
Uncovering Hidden Costs in Amazon Prime and Its Add-Ons
Amazon is a classic example of where subscriptions can hide in plain sight. It’s so much more than a single service. You’ve got the main Prime membership, but what about the Prime Video Channels you signed up for to watch one specific show? It's incredibly easy to add a subscription for something like Paramount+ or AMC+ and completely forget it's still billing you every month.
To get a clear view of all your Amazon-related charges, you need to dig into your account settings.
- First, log into your Amazon account from a web browser.
- In the top-right corner, hover your mouse over Account & Lists.
- A dropdown menu will appear; from there, click on Memberships & Subscriptions.
This page is your command center. It lays out everything, separating your core Prime membership from any channel subscriptions, Audible memberships, or even your "Subscribe & Save" orders. I can't stress this enough: review this page carefully. It’s all too common to sign up for a 7-day free trial for a channel and not realize it’s now a separate charge on top of your main Prime fee.
Finding Your Subscription Details on Netflix and Spotify
For standalone platforms like Netflix and Spotify, the process is a bit more direct but no less important. Thankfully, these services usually make it pretty simple to find your subscription details once you know where they live.
A common pitfall is assuming your subscription is managed within the mobile app. More often than not, you need to log into the service's website to see the full billing details, especially if you didn't originally subscribe through the Apple App Store or Google Play Store.
I always find it’s easiest to do this on a desktop computer.
- On Netflix: Just click your profile icon in the corner and select Account. Your plan details, billing history, and membership status are all right there on the main page.
- On Spotify: Click your profile name (top-right) and choose Account. Look for the Subscription option in the menu on the left to see your current plan and payment info.
This hands-on approach of logging into each service puts you back in the driver's seat. It eliminates any ambiguity and lets you make instant decisions about what to keep, downgrade, or cancel based on hard facts. Taking a few minutes for this manual search can bring some much-needed clarity to your monthly budget.
Finding all your active subscriptions is a great first step, but let's be honest—that's only half the battle. If you don't have a solid system in place, you’ll be right back here in six months, wondering where all your money is going again. Subscription creep is real, but a simple, repeatable process is your best defense.
This doesn't have to be some overly complex, time-sucking chore. Your system could be a straightforward spreadsheet or a dedicated app. The point is to create a single, reliable place where you can see every single recurring payment, what it costs you, and when it’s going to hit your account again.
This kind of proactive management is more critical now than ever. The subscription economy has matured, and companies are pouring resources into keeping you as a customer. In fact, recent industry analysis shows it's far more profitable for them to retain you than to find new customers, especially when a market is crowded. They're using everything from personalized offers to flexible payment plans to keep you on the hook. You can read more about these 2025 subscription growth trends to see just how hard businesses are working to keep you from hitting 'cancel.'
Build Your Subscription Command Center
First things first, you need to pick your tool. I've seen people have success with two main approaches, and the best one for you really depends on your comfort level.
- The DIY Spreadsheet: This is my personal favorite for privacy and control. Just open up a new sheet and create columns for the service name, monthly cost, annual cost (if applicable), renewal date, and which card or account you use to pay for it. You're in complete command.
- Subscription Tracking Apps: If you prefer automation, apps like Trim or Rocket Money are incredibly handy. They securely link to your bank accounts and automatically sniff out recurring charges. They’re super convenient, but you have to be okay with sharing financial data with a third party.
Whichever path you choose, consistency is everything. This central list will become the backbone of your entire management strategy.
Key Takeaway: The real goal here isn't just to make a list. It's to build a system that prompts you to regularly question each subscription. This simple shift moves you from being a passive spender to an active, conscious manager of your finances.
The "Keep, Pause, or Cancel" Framework
Okay, you've got your list. Now what? You need a quick, no-nonsense way to make decisions. I call it the "Keep, Pause, or Cancel" framework. It's just a simple mental checklist you run through for every single service.
Ask yourself these three questions:
- How often did I actually use this in the last month? Be brutally honest. If the answer is "once" or a flat-out "I don't remember," it's a prime candidate for the chopping block.
- Does it give me unique value I can't find elsewhere? If you're paying for three different music streaming apps, you can probably consolidate and cut two of them without missing a beat.
- Can I just pause this for a while? Many services now let you pause your subscription for 1-3 months. This is perfect for when you're busy or traveling and don't want to lose your account history or settings.
By adopting a simple system like this, you turn a messy, overwhelming task into a calm, manageable routine. For those who want to take it even further, our guide on how to manage online subscriptions dives into even more strategies.
When you combine a central tracker with a clear decision-making process, you can finally stop hemorrhaging money on services you forgot you even had.
Common Questions About Subscription Audits
Even with the best intentions, you’re bound to hit a few snags when you start digging into your subscriptions. It's a process that can get messy, but knowing how to handle these common roadblocks will keep you from getting discouraged. Think of this as your troubleshooting guide for when you get stuck.
We've pulled together the most frequent questions people have during a subscription audit to give you clear, practical answers.
What If I Can’t Find a Subscription I Know I’m Paying For?
This is, without a doubt, one of the most maddening parts of the process. You can see the charge plain as day on your credit card statement, but the subscription is a ghost—nowhere to be found in your app stores or account settings. It’s a common problem.
Your first step should always be a thorough search of your email accounts. Don't just look in your main inbox; dive into the spam, trash, and archive folders. Search for the company's name or keywords like "subscription," "receipt," "billing," or "invoice." More often than not, an old confirmation email will tell you exactly how and where you signed up.
If your email search comes up empty, go back to your bank or PayPal statement. The billing descriptor might look like gibberish, but a quick Google search of that exact text often reveals the actual company name. As a final option, you can always contact your bank or credit card provider. They can trace the payment to its source and give you the info you need to finally hunt it down.
Are Third-Party Subscription Management Apps Safe?
It’s tempting to use an app that promises to find all your recurring payments automatically. Many of them do a great job of uncovering subscriptions you forgot about, which can save a ton of manual effort. But that convenience comes with a catch.
For these apps to work, they need access to some of your most sensitive information, like your email inbox or even your bank account credentials. While the legitimate apps use strong encryption and security practices, you are fundamentally trusting a third party with your data.
Before signing up for any subscription manager, do your homework. Read the privacy policy to see exactly how they use and protect your data. Check reviews on different platforms to see what other users say about their security and reliability. If you feel even slightly uncomfortable handing over that access, sticking with a manual audit is the safer bet.
How Often Should I Check My Subscriptions?
The key here is consistency. You don't need to do a deep dive every single month, but you also don't want to let mystery charges stack up for a year. Finding a rhythm that works for you is what matters most.
As a general rule, performing a full, in-depth audit every six months is a great starting point. This schedule is frequent enough to catch forgotten trials before they cost you too much, but not so often that it feels like a chore.
For a lighter touch in between those deep dives, try one of these habits:
- Quarterly Check-in: Every three months, spend 10 minutes scanning your main hubs like the Apple App Store or Google Play Store.
- Monthly Statement Scan: When you review your bank statement each month, make a point to specifically look for any recurring charges you don't recognize.
Building this into a regular financial habit is the best way to stay in control. Once you find services you're ready to ditch, our guide on how to cancel unwanted subscriptions will walk you through the next steps.
Ready to enjoy premium services without the premium price tag? AccountShare allows you to access the best tools, streaming platforms, and software at a fraction of the cost through secure, shared access. Start saving today at https://accountshare.ai.
